|
______________________________________________________________
Making A Star Picture Frame In PSP
______________________________________________________________
NOTE: This is my very first tutorial so please
forgive me if I have forgotten something!
This tutorial was done in version PSP 7.02
You will need PSP for this tutorial to get a free
trial of the latest version of PSP to play with for
30 days download here:

You will also need Eye Candy 4000 or Eye Candy 3.1
to get a free trial of Eye Candy 4000 to play with for
a few days click here:

You will also need Super Blade Pro or Blade Pro by
Flaming Pear for this tutorial to get a free trial
to play with for 15 days get it here:

Disclaimer: This is my own idea any similarity to any
other Tutorial is purely coincidental.
You may be able to adapt this tutorial to use with
any other version of PSP also.
Elfie Creations ©
<<;-)
______________________________________________________________
To Create Your Star Picture Frame
______________________________________________________________
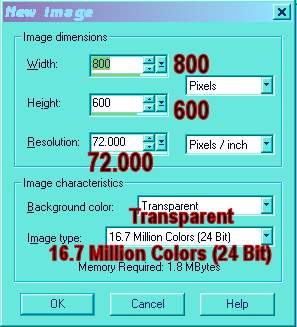
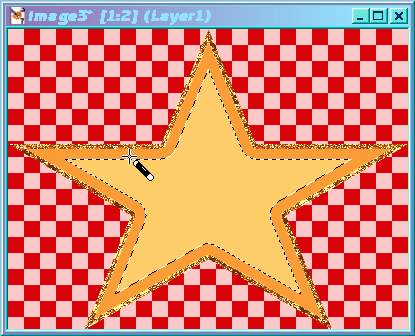
1.) Open New File 800 x 600 Transparent 16 mil. colors
(24 bit) See Example Below.
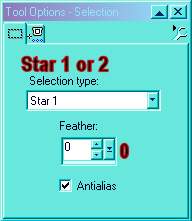
2.) Selction tool set on Star 1 or Start 2, Feather set at 0,
starting point at top left 0, 0 drag it out to the right
side and bottom at 800, 600.
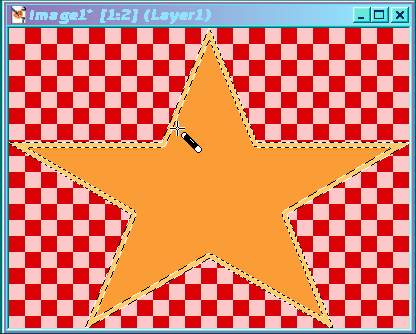
3.) Flood fill with color of your choice, I used #FCCD68 light
golden yellow. Go to Selections/Modify/Contract/10.
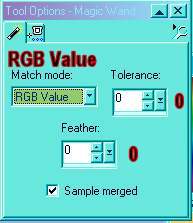
4.) Use your magic wand set at RGB Value, Tolerance = 0,
Feather = 0 select sample merged mine was checked.
(It didn't seem to make any difference if it was checked
or unchecked, I tried both.)
Select your star center flood fill center with a
contrasting color I used, #FFB9D37 medium golden yellow.
5.) Go to Selections/Modify/Contract by 10.

6.) Use your magic wand set at the same settings as before.
Select your star edge with the lighter color #FCCD68.
7.) Go to Effects/3D Effects/Inner Bevel/Settings set at:
See Example Below.
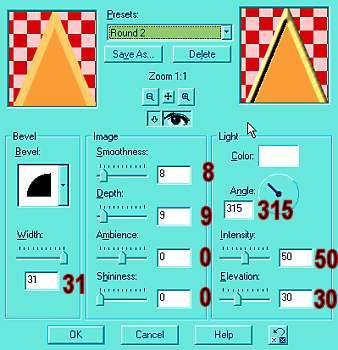
NOTE:If you would like to keep these settings for use again
Save As: Round 2
Then when ever you would like to use that same bevel
all you have to do is go to Round 2 on the list.
8.) If you would like a fancier look to your star use Blade Pro
or Super Blade Pro with my pre-set gold locket-ec.q5q or gold
locket-ec.q9q. I have included it in a zip file
here.
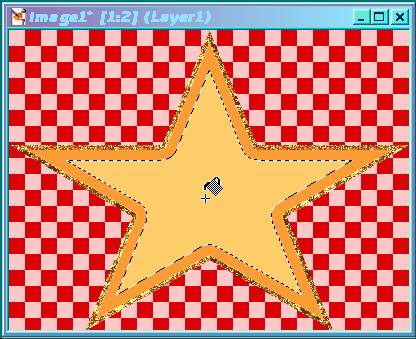
9.) Selections/Select None.
10.) Use your magic wand again same setting as before select the
center of your star, see example below.
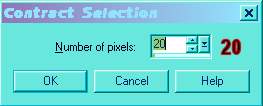
11.) Go to Selections/Modify/Contract by 20 this time.
12.) Flood Fill with contrasting color again in the center
of your star, see example below.
13.) Use your magic wand again same setting as before select
the contracted edge as before see example
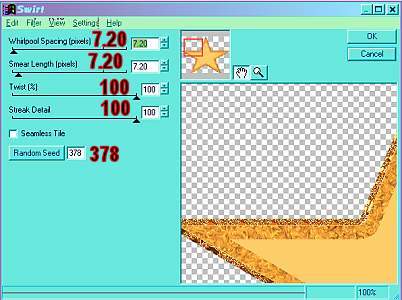
14.) Go to Effects/Plug-in Filters/Eye Candy 4000/Swirl/Small
& Twisty.
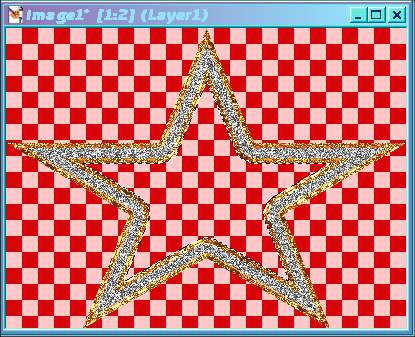
You should have something like this now, Example Below.
15.) Now if you want to you may make your star look a bit more
metalic do not deselect yet, now go to Effects/Artistic
Effects/Chrome with these settings.
Example below
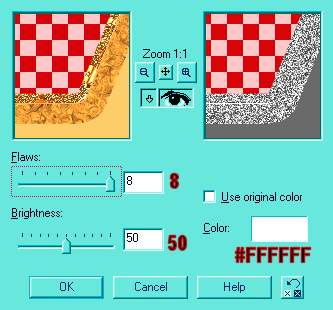
Note: To make it Silver looking use #FFFFFF (white) to make
it light gold use #C0B88A for a dark gold check the box use
original color if you used the same.
yellow colors as I did. I used the white to make it look
silver.
See Example Below.
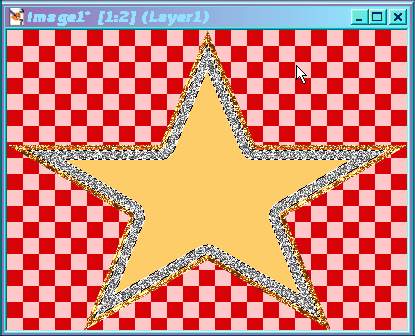
16.) Selections/Select None.
17.) Use your magic wand again same setting as before
select the center of your star as before.
18.) Go to Selections/Modify/Contract by 10 again.
19.) Flood Fill with contrasting color again in the center
of your star, as before.
20.) Use your magic wand again same setting as before select
the contracted edge as before.
21.) Now repeat step 7 or 8.
22.) Selections/Select None.
23.) Use your magic wand same settings as before, select the
center of your star as before now this time hit your delete
button at least 1 time sometimes 2 times is better.
It should look like this now.
See Example below.
24.) Now your frame is ready to be created for your picture,
just follow the directions below from steps 1 through 7.
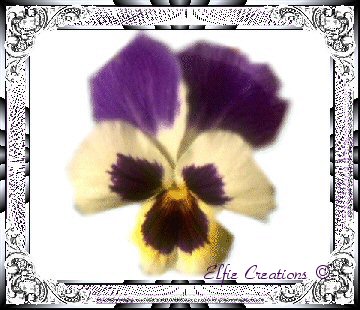
25.) Now you have just created a pretty kewl frame to use with
those start that you have around you, like your loved ones
or your favorite pet or best friends.
26.) Hope you enjoyed this tutorial and have fun!
______________________________________________________________
Creating a Custom Picture Frame
NOTE: This is a direct quote from PSP 7 Help files.
If your using a later version such as PSP 8 or 9 then
you can just look it up in your help files look under
creating picture frames.
______________________________________________________________
You can create a picture frame using the steps below.
While you are reading these instructions, you may also
find it helpful to open a few of the picture frame files
in Paint Shop Pro 7 to see how they are designed.
______________________________________________________________
To create a picture frame:
______________________________________________________________
1.) Create a new image with a transparent background,
and design your picture frame. Note that all areas
of the image canvas other than the frame must be
transparent.
2.) If the content of the frame extends to the edge of
all four sides of the image canvas (as seen in the
“Aqua Beveled” picture frame installed
with the program), skip to step <5>.
If the content of the frame does not extend to the
edge of all four sides of the image canvas (as seen
in the “Round Wood” picture frame),
you must create an alpha channel using the frame and
the transparent area inside it. The transparent area
inside the frame is where the image will appear. When
you add a frame containing an alpha channel, the Picture
Frame Wizard prompts you to select the color you would
like to use to fill the area outside the alpha channel
(outside the frame).
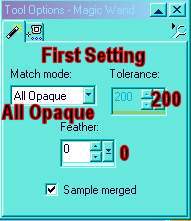
3.) To create the alpha channel, activate the Magic Wand
Selection tool , set the Match mode to all pixels [All
Opaque], the Feather to 0, and the Tolerance to 200, and
then click a pixel of the frame to select all non-transparent
areas.
See Example Below.
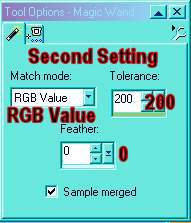
Next, set the Match mode to [RGB Value], and hold the
key while clicking the transparent area within
the frame to add it to the current selection.
See Example Below.
4.) Choose the Selections > Save to Alpha Channel to create
the channel.
You can use whatever name you wish for the alpha channel
or accept the default name offered by the program.
5.) Choose Selections > Select None to remove the selection
from the image.
6.) Choose File > Save As to save the file to the “
Frames” sub-folder of the Paint Shop Pro 7 folder.
The file must be saved as a “Paint Shop Pro Image
(PSP) file. The filename you use is the name that will
appear in the Picture Frame style drop-down list of the
Picture Frame Wizard.
7.) Using the Paint Shop Pro Browser, open the Frames
sub-folder of the Paint Shop Pro 7 folder and rename the
extension of the file you saved from PSP to PFR.
The frame is now ready to use in Paint Shop Pro 7.
You can skip step <6> in the future by adding “
PFR” as an associated extension with the Paint
Shop Pro Image (PSP) format using the File Format Associations
preferences dialog box in Paint Shop Pro’s preferences.
This will allow you to type [PFR] as the extension when saving
the picture frame and eliminate the need to rename the file
extension using the Browser.
______________________________________________________________
Adding a Picture Frame
______________________________________________________________
Paint Shop Pro contains a variety of picture frames that you
can add to your image as a separate layer. Choose from several
types of wood, metal, stone, and other decorative surfaces.
To add a picture frame, you select the frame and choose whether
to place it inside or outside the edges of the image.
If the image contains transparent areas outside the frame,
you select a color with which to fill the areas.
Paint Shop Pro creates the frame on a new layer named
[Picture Frame.]
After you have added a frame, you can change its color.
Make the layer containing the frame active, and then adjust
the hue of the layer using the Hue/Saturation/Lightness dialog box.
Note: Because the picture frame is added as a new layer,
your image must be 24-bit or greyscale to use this feature.
______________________________________________________________
Disclaimer:
This is my own idea any similarity to any other
Tutorial is purely coincidental.
Terms of Use:
Please feel free to use the tutorial final project
how ever you like.
Do not send this through email as the person receiving
it will not see all the backgrounds.
Please only send the link to this page.
You may copy this page onto your own PC for your own
use but,
Please do not save this tutorial as your own for download
or in a CD or in any other monitary way, thanks
<<'-)
Char
Elfie Creations©


Click On Button
To Email Me!


You may turn off the
sound by clicking on the
little square button
somewhere at the top of this page.
~ MUSIC: Anne! ~
|