___________________________________________________
The Oval Glass Door Insert Tutorial Was Done In PSP 7.02
___________________________________________________
You will need PSP of course for this tutorial
if you don't have it you can get a free trial of
PSP the latest version to play with for 30 days
download it by clicking on the logo, but the tools
are not all in the same places as in PSP 7.02

You will need my Selection zip file to make it
Get it
here
Save the zip file then open and install it to
your selections folder in PSP.
You will need my Blade Pro or Super Blade Pro
presets clear glass-ec.q5q or clear glass-ec.q9q
get it and cut crystal glass-ec.q5q or cut crystal
glass-ec.q9q both are included in the zip file
here.
save the zip file then open and save it to your
working plug-ins folder clear glass-ec.q9q Blade
Pro/environments and textures or clear glass-ec.q5q
Super Blade Pro/environments and textures then
open it in PSP.
You will need my glass patterns zip file if you
don't have the plug-in Blade Pro or Super Blade Pro
get them
here.
save the zip file then open and save the glass
patterns to your patterns folder in PSP.
___________________________________________________
Making the Oval Insert
___________________________________________________
1.) Open new image size 400w x 500h transparent 16 mi.
colors.
2.) Add new raster layer and name it Oval.
Make sure you have no color in the forground
and white in the background color.
3.) Using the Shapes tool set on Ellipse hold down
the right mouse button go to 200 x 250 center of
your image look at the numbers on the bottom left
of your window to make sure you have the center now
pull out to the edges stop a bit away from the edge.
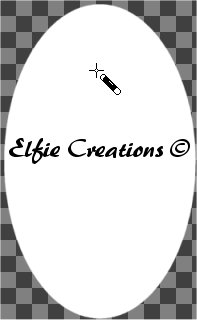
You should have something like this:
___________________________________________________
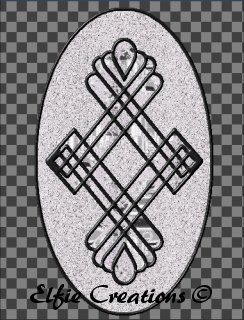
Adding The Leading or Gold Design
___________________________________________________
4.) Add new raster layer name it lead or gold outline.
5.) Go to Selections/Load from Disk/glass_insert_lines-ec.sel
and flood fill with white to use a Super Blade Pro preset
(I used ShinyGold.q5q or to use a gold pattern or to use
a gold gradient or flood fill with charcoal gray #202020
to make it like lead and use an inner bevel.
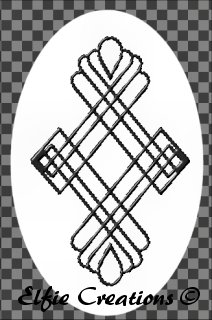
You should have something like this:
___________________________________________________
Adding The Glass To The Insert
___________________________________________________
6.) Add new raster layer name it glass flood fill
with white and go to Selections/Load from Disk/
glass_insert_lines-ec.sel and hit the delete
key on your keyboard. Deselect. Use the magic wand
and Select outside the design and hit the delete
on your keyboard. Select the center diamond with
the magic wand and hit delete on the keyboard.
Deselect.
Go to Selections/Select All and Selctions/Float.
Using Super Blade Pro preset clear glass-ec.q5q or
Blade Pro preset clear glass-ec.q9q or flood
fill with door_glass-ec.jpg pattern.
Deselect and move layer below gold/lead layer.
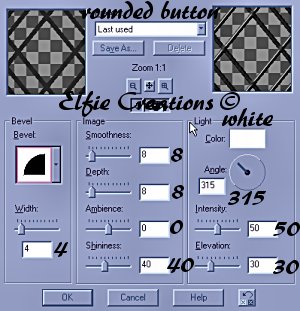
Inner Bevel settings:
Bevel Shape = Round
Width = 4
Smoothness = 8
Depth = 8
Ambience = 0
Shininess = 0
Color = White
Angle = 315
Intensity = 50
Elevation = 30
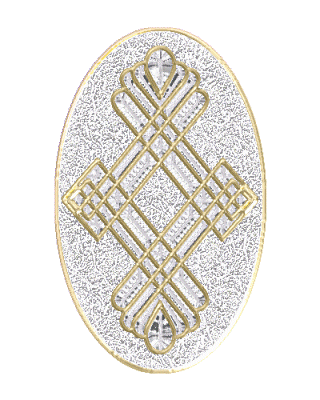
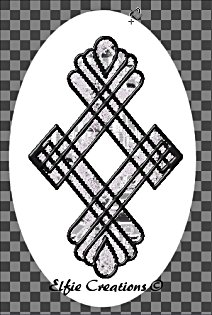
You should have something like this:
7.) Hide all layers and make the Oval layer
active and Select the oval with magic wand set at
normal and use Blade Pro preset glass_crackle-ec.q9q
or Super Blade Pro preset glass_crackle-ec.q5q or use
the frosted_glass-ec.jpg pattern and flood fill with it.
Un-hide all layers. Do not deselect.
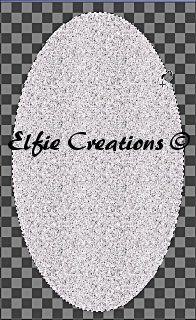
You should have something like this:
8.) Add new raster layer and go to Selections/Modify/
Expand by 5 flood fill with white and move below the
glass crackle layer oval and repeat the Super Blade
Pro preset (I used ShinyGold.q5q for my finished
image or use a gold pattern or to use a gold gradient
or flood fill with charcoal gray #202020 to make it like
lead and use an inner bevel. Go to Selections/Contract
by 5 and hit delete on the keyboard.
Go to Selections/Invert, Selections/Float and repeat
Inner Bevel if you used the Charcoal color. Deslect.
9.) Merge/Merge/Vissible and save as a tube or just a psp
file to copy and paste as you wish into a door frame
or make layer1 active and go to Selections/Select
All and paste in Selection a background image and
Merge/Merge all flatten and save as a jpg file or
flood fill with a color not in your image and make
it a gif file.
Note: All preview images are made with flood fill
patterns and colors no Blade Pro or Super Blade Pro
presets where used.
___________________________________________________
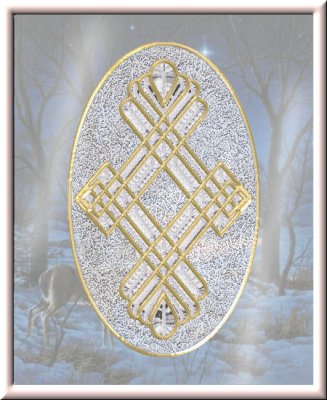
FINISHED GLASS OVAL WINDOW INSERT
___________________________________________________