WELCOME TO BACKGROUND TUTORIAL

.................... Elfie Creations © .................... Welcome To My PSP 7 Background Tutorial ....................

^You May Start The Tutorial By
Reading Everything On This Page First^

divider

_______________________________________________________________________

Making A Cable Knit Background For Your Web Pages Or Stationery In PSP

________________________________________________________________________

You will need PSP for this tutorial to get a free
trial of the latest version to play with for 30 days
download it here.

PSP 9

You will also need the Plug-in Distort Filter for
this tutorial to get it here.
if you are using version PSP 6 you will not have the
filter colored edges you can just skip that part of the
tutorial (You may want to just download all these kewl filters.

You will also need the Plug-in Filter FM Tools for this
tutorial get the free tile tool demo here.
To create the Granny Square Background you will also
need the Plug-in Filter Simple to get it here: Simple Filters

NOTE: Filters use a format originally designed
for Adobe Photoshop, PSP can read this format,
but it needs an additional file called msvcrt10.dll
to be placed in the Windows/System folder.
If you don't have it you can get it here

Disclamer: This is my own idea any similarity to
any other Tutorial is purely coincidental.

You may be able to adapt this tutorial for other
versions of PSP also.
Elfie Creations ©
<<;-)

For a plain version with no pictures you may print
out as a hard copy get it here.

________________________________________________________________________

Cable Knit Background

________________________________________________________________________

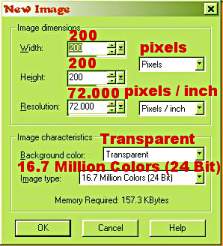
1.) Open new Transparent image 200 x 200
flood fill with color I used: a Tan
(#D0B48F, R:208, G:180 B:143)

Open New Image

2.) Go to Effects/Texture Effects/Blinds set at:
Width = 15
Opacity = 25
Color = Brown (#6E2212, R:110, G:34, B:18)
use a color a bit darker than the one you
chose to flood fill your image with.
Horizantal = Checked
Light from left/top = Checked

Blinds Setting

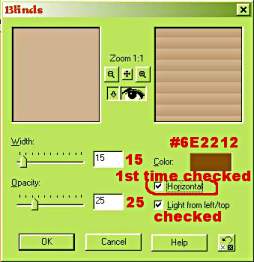
3.) Repeat 2 but this time un-check Horizontal,
you now should have something like this.

Sample 1

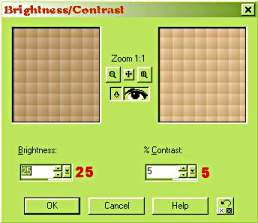
4.) Go to Colors/Adjust Bright/Contrast with these settings:
Brightness = 24
Contrast = 5

Bright Contrast Setting

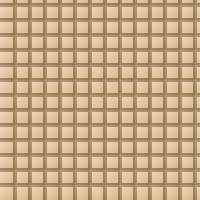
5.) Go to Effects/Artistic Effects/Charcoal with these settings:
Detail = 100
Opacity = 25

Charcoal Setting

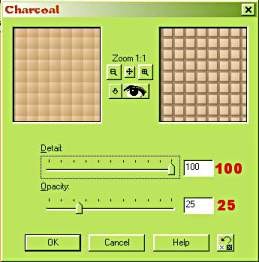
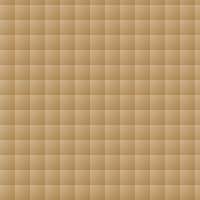
You now should have something like this.

Sample 2

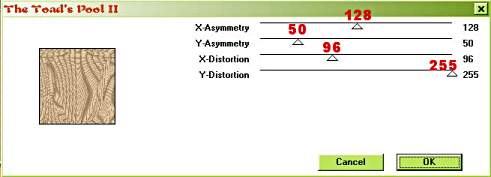
6.) Go to Effects/Plug-in Filters/Distort/Toad's Pool II
with these settings:
X-Asymmetry = 128
Y-Asymmetry = 50
X-Distortion = 96
Y-Distotion = 255

Distort Setting

7.) Go to Effects/Plug-in Filters/Simple/Quick Tile.

Quick Tile Setting

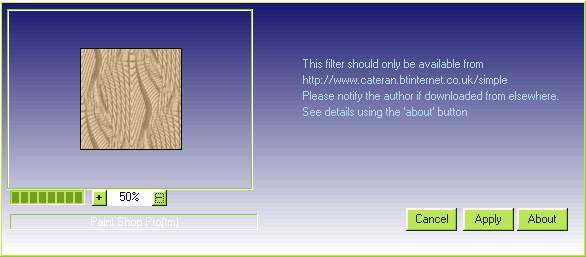
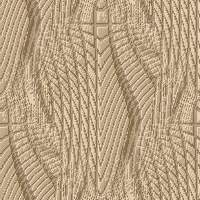
Now it's starting to look like a cable knit!

Sample 3

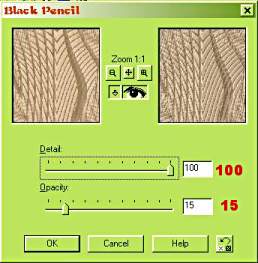
8.) Go to Effects/Artistic Effects/Black Pencil
with these settings:
Detail = 100
Opacity = 15

Black Pencil Setting

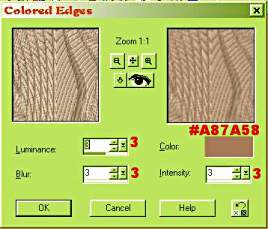
9.) Go to Effects/Artistic Effects/Colored Edges
with these settings:
Luminance = 3
Blur = 3
Color = Medium Brown (#A87A58, R:168, G:122, B:88)
Pick a bit darker color of your flood fill color.
Intesity = 3

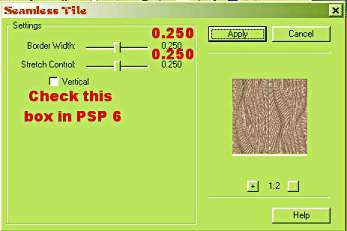
Note: If you are using PSP 6 skip this step because
this filter is not included in that version.

Colored Edges Setting

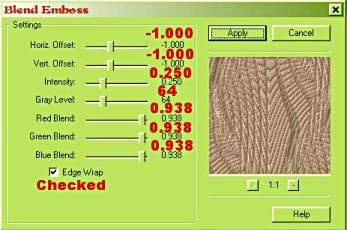
10.) Go to Effects/Plug-in Filters/FMTools/Blend Emboss
with these settings:
Horiz. Offset = -1.000
Vert. Offset = -1.000
Intensity = 0.250
Gray Level = 64
Red Blend = 0.938
Green Blend = 0.938
Blue Blend = 0.938
Edge Wrap = Checked

Blend Emboss Setting

11). Go to Effects/Plug-in Filters/FMTools/Seamless Tile
with these settings:
Border Width = 0.250
Stretch Control = 0.250
Vertical = Checked

Seamless Tile Setting

12). Go to Colors/Adjust/Bright/Contrast
with the same settings as before on 4.

13). Go to Layers/Merge/Merge All (flatten).

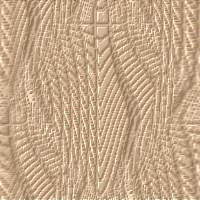
That's it you now can flood fill your background
with this tile and have a cable looking knit background.

Sample 4

________________________________________________________________________________

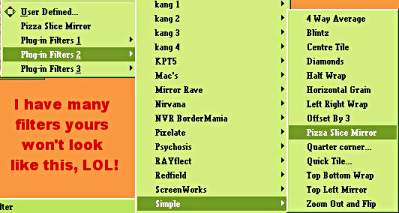
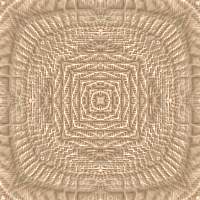
Turn Your Cable Knit Tile Into A Granny Square Just By Adding One Step More.

_________________________________________________________________________________

14). Go to Effects/Plug-in Filters/Simple/Pizza Slice Mirror.

Pizza Sliced Mirror Settings

That's it you now have a crocheted looking
granny square to flood fill your backgrounds with.

Sample 5

Hope you enjoyed this tutorial and have fun!

_________________________________________________________________________________

divider

ElfieCreations@gmail.com
Click On Button
To Email Me!

divider

Back To Animated Locket Tutorial Page
 
Home Page
 
Next To Coffee Pot Tutorial Page

divider


Terms of Use:
Please feel free to use the tutorial final project how ever you like.

Do not send this through email as the person receiving it will
not see all the backgrounds.
Please only send the link to this page.
You may copy this page onto your own PC for your own use
but, PLEASE do not save this tutorial as your own
for your web site, download or in a CD or in any monitary way,
thanks
<<'-)
Char
Elfie Creations©

Elfie Creations ©
created all backgrounds
& graphics on this page.

divider

You may turn off
the sound by clicking on the
little square somwhere at
the top of this page.
~ Music: Fairy Wings ~