_______________________________________________________________________
Making A Country Bench In PSP 7
_______________________________________________________________________
This Tutorial is done in selections there are no
screen shots to go by, therefore this tutorial assumes
you have a good working knowledege of PSP.
You will need PSP of course for this tutorial to get a
free trial of the latest version to play with for 30 days
download it by clicking on the logo
here.

You will need my Selections zip file
here.
Save the zip file then open and install it to your selections
folder in PSP.
You will need my checks pattern image right click on it
and save it to your HD inside the working folder.

After you have saved the file to your working
folder then open it in PSP or save it to your pattern
folder in PSP.
________________________________________________________________________
Making the Bench
________________________________________________________________________
1.) Open new image size 500w x 350h transparent 16 mil. colors.
Rename layer1 background.
2.) Add new raster layer name it seat.
Go to Selections/Load From Disk/seat-ec.sel and flood fill
with #FFFAE7.
3.) Go to Effects/3D Effects/Inner Bevel
Preset name = Bench
Bevel Shape = Round Row #1 Shape #2
Width = 5
Smoothness = 25
Depth = 3
Ambience = 0
Shininess = 0
Color = White
Angle = 315
Intensity = 50
Elevation = 30
4.) Add new raster layer name it front board.
Go to Selections/Load From Disk/front-ec.sel and flood fill
with #FFFAE7.
5.) Repeat 3 inner bevel.
6.) Add new raster layer name it back.
Go to Selections/Load From Disk/back1-ec.sel and flood fill
with #FFFAE7.
7.) Go to Selections/Load From Disk/back2-ec.sel and flood fill
with #FFFAE7.
8.) Go to Effects/3D Effects/Inner Bevel
Preset name = Bench2
Bevel Shape = Round Row #1 Shape #2
Width = 2
Smoothness = 8
Depth = 3
Ambience = 0
Shininess = 0
Color = White
Angle = 315
Intensity = 50
Elevation = 30
9.) Go to Selections/Load From Disk/front_arms-ec.sel and flood fill
with #FFFAE7.
10.) Repeat 8 inner bevel.
11.) Go to Selections/Load From Disk/side_arms-ec.sel and flood fill
with #FFFAE7.
12.) Repeat 8 inner bevel.
____________________________________________________________________________________
Adding The Bench Designs
____________________________________________________________________________________
13.) Go to Selections/Load From Disk/seat_design-ec.sel and flood fill
with checked pattern set it small enough that it has two rows of
checks in design area.
14.) You may omit the rest of the designs if you like.
Find an image that you like a tube would be best copy and paste as
new layer.
15.) Resize to the width of the seat uncheck all layers first, using the
deformation tool shape it between the two design stripes.
16.) Add new raster layer name it front design.
17.) Find a ding bat or font design you like and make one on the left front
and repeat it on the right front. I used Fleurons ceC.
18.) Add new raster layer and name it back design make smaller designs
across the back by making one and then duplicating the layer and
mirror it and use the mover tool to position them across the back.
Merge the back design layers visible and rename the merged layer
back design. Also use the Image/Rotate right by 12 all layers NOT
checked to fit them on the back. I use the font Fleurons c or C.
19.) You can also add a new raster layer and name it arm design and use
a different design for it then duplicate the layer and mirror it also
and use the mover tool to position them. I used the font Fleurons e.
20.) Save it as a tube, a gif or put a background behind it,
that's it your done, LOL!
_____________________________________________________________________________
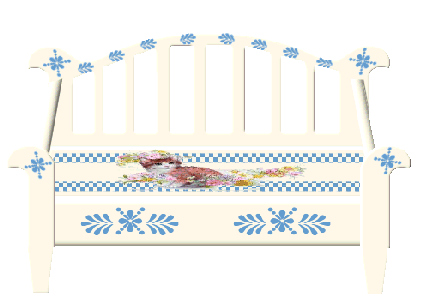
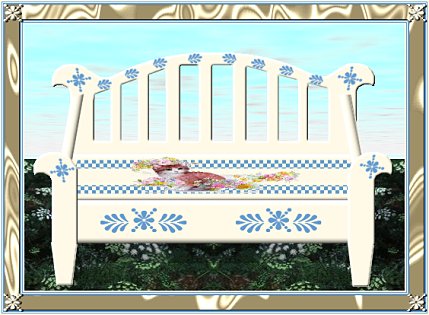
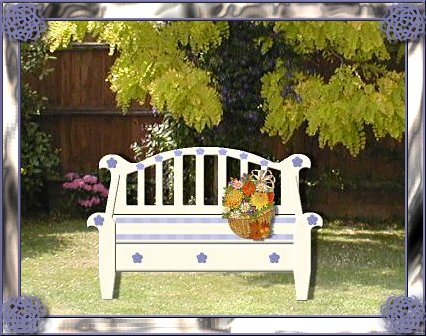
FINISHED COUNTRY BENCH
_____________________________________________________________________________